Deep Dive into Microservices with NestJS
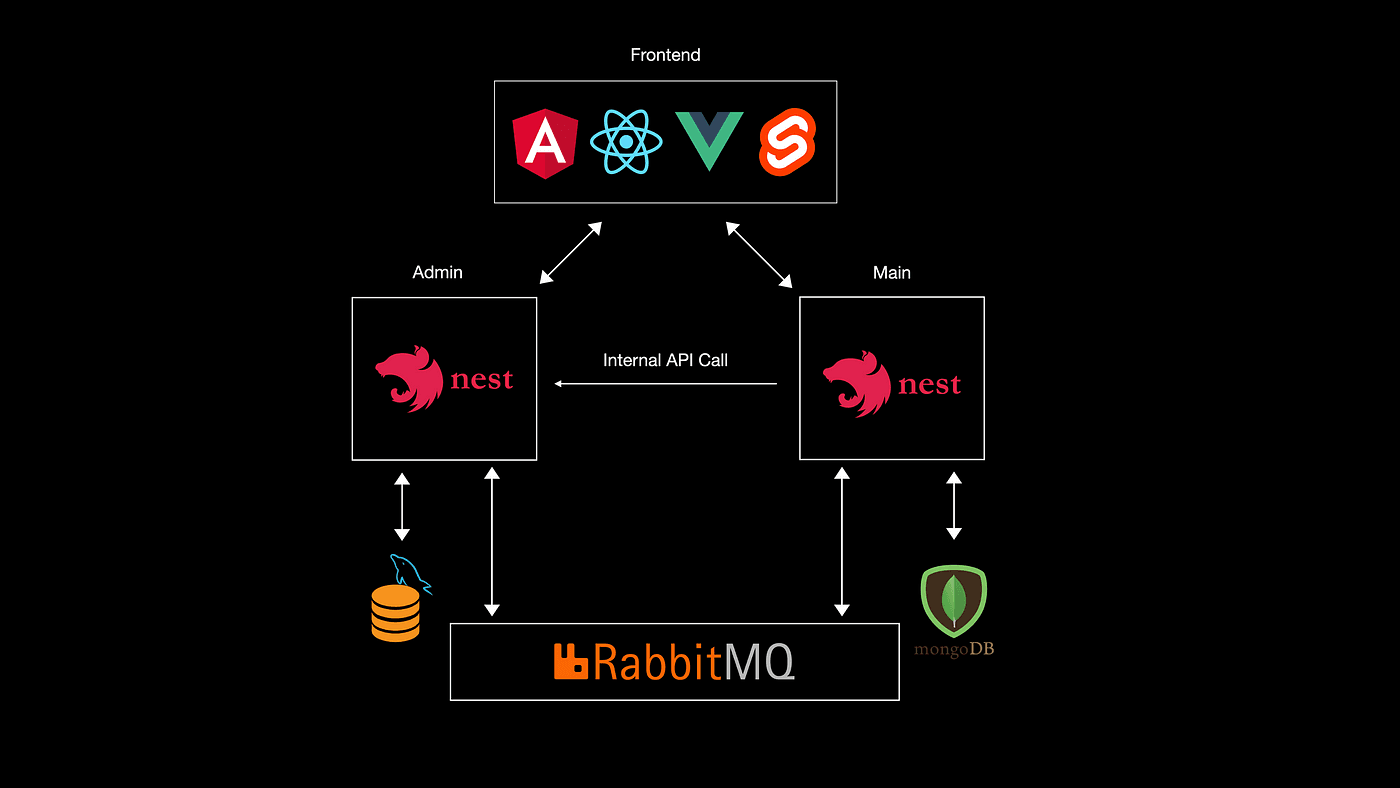
Table Of Content
- Introduction to Microservices and NestJS
- Setting Up a NestJS Project for Microservices
- Understanding Core Concepts of Microservices in NestJS
- Building a Simple Microservice with NestJS
- Inter-Service Communication in NestJS
- Example Using Redis:
- Managing Data in a Microservices Architecture
- Error Handling and Logging in NestJS Microservices
- Testing Microservices in NestJS
- Deploying NestJS Microservices
- Advanced Topics in NestJS Microservices
- Conclusion
Microservices architecture has become increasingly popular due to its ability to enhance scalability, maintainability, and deployment flexibility. NestJS, a progressive Node.js framework, is well-suited for building efficient, reliable, and scalable server-side applications, including microservices. In this article, we'll take a deep dive into developing microservices with NestJS, covering everything from setting up a project to advanced communication patterns.
Introduction to Microservices and NestJS
Microservices architecture involves dividing a large application into smaller, independent services that communicate with each other. This contrasts with the monolithic architecture, where the entire application is a single, unified unit. NestJS is a powerful framework that simplifies the creation of microservices by providing out-of-the-box support for a variety of transport layers and communication protocols.
Setting Up a NestJS Project for Microservices
To get started with NestJS, you need to set up a new project. Here’s a step-by-step guide:
- Install NestJS CLI:
npm install -g @nestjs/cli - Create a New Project:
nest new project-name - Project Structure:
NestJS projects have a modular architecture. Key directories and files include:
src/: Contains the application code.main.ts: Entry point of the application.app.module.ts: Root module of the application.
Understanding Core Concepts of Microservices in NestJS
NestJS simplifies the development of microservices through its robust framework features. Key concepts include:
- Transport Layers: NestJS supports various transport mechanisms like TCP, Redis, NATS, and more.
- Message Patterns: Define how microservices communicate using predefined message patterns.
- Controllers, Services, and Modules: These are the building blocks of a NestJS application, organized to facilitate modular and maintainable code.
Building a Simple Microservice with NestJS
Let’s build a basic microservice:
-
Generate a Service and Controller:
nest generate service example nest generate controller example -
Implement a Simple Endpoint:
// example.service.ts
import { Injectable } from "@nestjs/common";

@Injectable()
export class ExampleService {
  getData(): string {
    return "Hello from microservice";
  }
}

// example.controller.ts
import { Controller, Get } from "@nestjs/common";
import { ExampleService } from "./example.service";

@Controller("example")
export class ExampleController {
  constructor(private readonly exampleService: ExampleService) {}

  @Get()
  getData(): string {
    return this.exampleService.getData();
  }
}
Inter-Service Communication in NestJS
NestJS offers multiple ways for microservices to communicate:
- HTTP: Standard RESTful communication.
- Message Brokers: Using Redis, NATS, or RabbitMQ for pub/sub messaging.
Example Using Redis:
// main.ts
import { NestFactory } from "@nestjs/core";
import { MicroserviceOptions, Transport } from "@nestjs/microservices";
import { AppModule } from "./app.module";

async function bootstrap() {
  const app = await NestFactory.createMicroservice<MicroserviceOptions>(
    AppModule,
    {
      transport: Transport.REDIS,
      options: {
        url: "redis://localhost:6379",
      },
    }
  );
  await app.listen();
}
bootstrap();
Managing Data in a Microservices Architecture
Data management in microservices can be complex due to the need for decentralized data storage. A common approach is to use a database per service. Here’s how to integrate PostgreSQL with a NestJS microservice:
-
Install TypeORM and PostgreSQL:
npm install @nestjs/typeorm typeorm pg -
Configure TypeORM:
// app.module.ts
import { TypeOrmModule } from "@nestjs/typeorm";

@Module({
  imports: [
    TypeOrmModule.forRoot({
      type: "postgres",
      host: "localhost",
      port: 5432,
      username: "test",
      password: "test",
      database: "test",
      entities: [__dirname + "/**/*.entity{.ts,.js}"],
      synchronize: true,
    }),
    TypeOrmModule.forFeature([ExampleEntity]),
  ],
  controllers: [ExampleController],
  providers: [ExampleService],
})
export class AppModule {}
Error Handling and Logging in NestJS Microservices
Proper error handling and logging are crucial for maintaining microservices:
-
Global Error Handling:
import { ExceptionFilter, Catch, ArgumentsHost, HttpException, } from "@nestjs/common"; import { Request, Response } from "express"; @Catch(HttpException) export class HttpErrorFilter implements ExceptionFilter { catch(exception: HttpException, host: ArgumentsHost) { const ctx = host.switchToHttp(); const response = ctx.getResponse<Response>(); const request = ctx.getRequest<Request>(); const status = exception.getStatus(); const errorResponse = { code: status, timestamp: new Date().toISOString(), path: request.url, method: request.method, message: exception.message || null, }; response.status(status).json(errorResponse); } } -
Logging with Winston:
npm install @nestjs/winston winston// main.ts import { Logger } from "@nestjs/common"; import { WinstonModule } from "nest-winston"; import * as winston from "winston"; const logger = WinstonModule.createLogger({ transports: [ new winston.transports.Console(), new winston.transports.File({ filename: "combined.log" }), ], }); async function bootstrap() { const app = await NestFactory.create(AppModule, { logger, }); await app.listen(3000); } bootstrap();
Testing Microservices in NestJS
Testing ensures your microservices function correctly:
-
Unit Testing with Jest:
// example.service.spec.ts
import { Test, TestingModule } from "@nestjs/testing";
import { ExampleService } from "./example.service";

describe("ExampleService", () => {
  let service: ExampleService;

  beforeEach(async () => {
    const module: TestingModule = await Test.createTestingModule({
      providers: [ExampleService],
    }).compile();

    service = module.get<ExampleService>(ExampleService);
  });

  it('should return "Hello from microservice"', () => {
    expect(service.getData()).toBe("Hello from microservice");
  });
});
Deploying NestJS Microservices
Deploying microservices often involves containerization and orchestration:
-
Containerization with Docker:
FROM node:14 WORKDIR /usr/src/app COPY package*.json ./ RUN npm install COPY . . EXPOSE 3000 CMD ["npm", "run", "start:prod"] -
Orchestration with Kubernetes:
apiVersion: apps/v1
kind: Deployment
metadata:
  name: example-deployment
spec:
  replicas: 2
  selector:
    matchLabels:
      app: example
  template:
    metadata:
      labels:
        app: example
    spec:
      containers:
        - name: example
          image: example-image
          ports:
            - containerPort: 3000
Advanced Topics in NestJS Microservices
Explore more advanced aspects:
- Service Discovery and API Gateways: Use tools like Consul and Kong.
- Security: Implement JWT authentication and authorization.
- Distributed Tracing: Use tools like Jaeger to trace requests across services.
Conclusion
Building microservices with NestJS offers a robust and scalable solution for modern applications. By leveraging NestJS’s powerful features and modular architecture, you can create efficient and maintainable microservices. Continue exploring and experimenting with NestJS to fully harness its potential in your microservices projects.
For more information and detailed documentation, visit the NestJS documentation.